Everything you need to know about the recessed downlight cut-out size
By Amy Topsun lighting
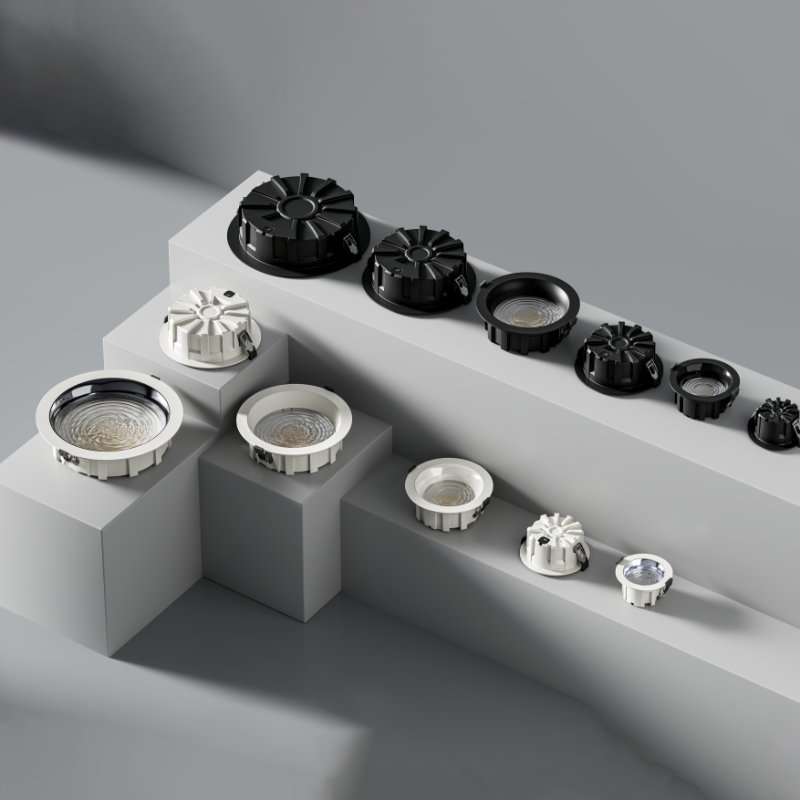
The dimensions and specifications of recessed downlights include physical parameters such as the downlight’s outer size, the cut-out size, and the installation depth. The cut-out size directly affects whether the downlight can be successfully embedded and installed, and is closely related to the spatial lighting layout.
Recessed downlight sizes are typically measured in inches, with common cut-out sizes ranging from 2.5 inches to 8 inches, corresponding to the hole size of approximately 65mm to 200mm. In the industry, “inches” generally refer to the inner diameter of the lamp reflector or light outlet, not the outer diameter of the recessed downlight. The actual cut-out size should be specified in the product specifications.
LED Downlight Cut-Out Size Standards
Downlight cut-out sizes are in inches (1 inch ≈ = 25.4mm). Common specifications and corresponding parameters are shown in the table below:
| Size (inches) |
Cut-Out(mm) |
Diameter (mm) |
Applicable Scenarios |
| 2.5 |
65 |
75-85 |
Auxiliary lighting for home corridors and small shops |
| 3 |
75 |
90-100 |
Basic lighting for living rooms and bedrooms, suitable for low-ceiling spaces |
| 4 |
100 |
115-125 |
General lighting for conference rooms and restaurants, preferred for commercial spaces |
| 5 |
125 |
140-150 |
Focused lighting for kitchens and offices, areas requiring high brightness |
| 6 |
150 |
165-180 |
Main lighting for exhibition halls and shopping mall atriums, large spaces |
| 8 |
200 |
220-235 |
Airports and large commercial complexes have high power requirements |
Pre-installation requirements of hole size for different ceiling materials:
Gypsum board ceiling: More 3-5mm of flexible space is recommended.Metal ceiling: Due to the material’s rigidity, the hole sizes must be strictly adhered to.Wood veneer ceiling: More 8-10mm of adjustment allowance can be reserved to accommodate thermal expansion and contraction.
Application scenarios for choosing the recessed LED downlights size
1. Low ceiling height (≤3 meters)
3-inch ultra-thin recessed downlights are preferred, with a total height ≤30mm, offering better visual extension.Retail store display area: 4-inch recessed downlights with a 36° beam angle are recommended, forming a 0.8-1.2 meter light spot diameter, ensuring a vertical illuminance of ≥500lx for merchandise.Restaurant booth area: 4-inch downlights spaced 60-80cm apart are recommended, combined with 2700K warm light to create a cozy atmosphere.*** Avoid using high-power downlights larger than 6 inches in low-ceiling spaces, as they can easily create a “light hole effect,” disrupting spatial proportions.
2. Medium-sized Commercial Spaces (3-5 meter ceiling height)
4-inch standard downlights are preferred, paired with 4000K neutral light to balance brightness and comfort.Apparel Retail Area: Requires Ra≥90, high-CRI downlights to ensure accurate fabric color reproduction.Jewelry Display Area: 5-inch downlights with a 15° narrow beam are recommended, achieving 800-1000lx illuminance in key areas.Corridor Area: Downlight spacing is recommended at 80-100cm, with display areas 15-20cm away from walls to ensure effective wall washing.
3. Large Public Spaces (≥5 meter ceiling height)
6-inch and larger downlights require Ra≥90 high-CRI light sources and use 6063 aluminum alloy to improve heat dissipation.Airport Waiting Lounges: 6-inch downlights spaced 1.5-2 meters apart are recommended, paired with an intelligent 0-10V dimming system.Exhibition Hall Main Lighting: 8-inch downlights with a 60° beam angle are recommended to achieve a spatial uniformity of ≥0.7.Office Area: The spacing between LED downlights is 130-150cm to create a uniform lighting effect and reduce glare interference.
Maybe you would like to read A Complete Guide to Choosing LED Downlights
Cut-Out Technical Points
1. Precise Hole Control
Use a laser positioning device to ensure hole position error ≤±2mm;
For plasterboard ceilings, it is recommended to install the downlights before applying plaster.Special Structure Treatment:
Curved Ceilings: 3D scanning positioning is required, with hole position error controlled within ±3mm.Perforated Areas: Adjustable spring-clip downlights are recommended to accommodate deviations in hole positions of 5-15mm.* Avoid overlap with air-conditioning vents and firefighting facilities; sprinkler positioning requires laser-assisted calibration.
2. Heat Dissipation and Safety Standards
For recessed installations, ensure the ceiling thickness is ≥ the light fixture height + 5cm to allow for heat dissipation.High-power downlights (≥6 inches): Require a 6063 aluminum alloy heat-dissipation structure with a fin height ≥25mm—actual measured full-load surface temperature ≤65℃.Metal ceiling installation: Insulating gaskets should be used to prevent short-circuit risks.
3. Smart System Compatibility
- DMX512 dimming system: Allow for 20% inch redundancy. For example, a 140mm opening is recommended for 4-inch downlights to ensure compatibility with the driver module.- Complex ceiling designs: A split-driver solution is recommended, with the power module located externally near the access panel for easy maintenance.
Common Solutions Regarding Downlight Size Selection and Installation
Myth 1: Large downlights are suitable for all spaces.Correction 1: Using 6-inch downlights in spaces with a ceiling height below 3 meters will result in overly concentrated light, creating light spots. It is recommended for ceiling heights ≥5 meters. Actual measurement data show that using 6-inch downlights in a 3-meter-high space will result in floor illuminance unevenness exceeding 0.5, significantly reducing visual comfort.
Myth 2: The cut-out size can be adjusted arbitrarily.Correction 2: An excessively large cut-out hole can cause the downlight fixture to fall off, while an excessively small cut-out hole requires enlarging and can damage the ceiling. It is recommended to adhere to the downlight’s dimensions strictly during installation. An error of more than 2mm in the cut-out for metal ceilings will increase installation difficulty by 30%. It is best to buy the downlight fixture first, then cut the hole to the actual dimensions.Myth 3: Ignoring the Color Rendering Index (Ra)Correction 3: Commercial display scenarios require light sources with Ra ≥ 90 to avoid color distortion of merchandise; for home scenarios, Ra ≥ 80 is sufficient for daily needs. Actual testing in jewelry display areas shows that lighting with Ra < 85 reduces the fire of diamonds by more than 30%.
Industry Trends and Selection Recommendations
Current downlight designs show a trend towards “modularization + intelligence”: Adjustable downlights: Adaptable to multiple hole sizes from 75-165mm. For renovation projects, a spring-loaded clip structure is recommended to improve installation flexibility.Deep anti-glare design: Deep cup downlights are preferred in office areas, with a UGR (Uniform Glare Ratio) ≤19, to alleviate visual fatigue; actual measurements show that when UGR >22, employee visual fatigue increases by 40%.
Conclusion
Precise matching of downlight cut-out sizes is fundamental to the stable operation of the lighting system. During the design phase, selection should be based on careful consideration of ceiling height, functional requirements, and heat dissipation. During construction, strict adherence to cut-out specifications is essential to achieve efficient and safe lighting effects.
Previous
3 phase 4 Wires Track Lighting Rail and Accessories
Read More